Specify the Material. Check the Construction. Confirm the Fit.
A hat specification works best when material composition, construction and finished measurements are recorded separately. Use this guide to describe the version your business needs and connect those choices to a sample you can assess.
Fibre composition and fabric type describe different things
Cotton, polyester and polyester-cotton blends appear in the Relia Hats catalogue as material references. They are starting points for a component discussion. Confirm the actual percentages and the parts covered by the specification, rather than applying one fabric label to the crown, mesh, lining, band and closure together.
Canvas, twill, corduroy, mesh and terry describe construction or texture rather than a complete fibre recipe. Two hats can share a fabric description and still differ in composition, thickness or finish. Compare the selected material on its own terms and then on the completed hat.
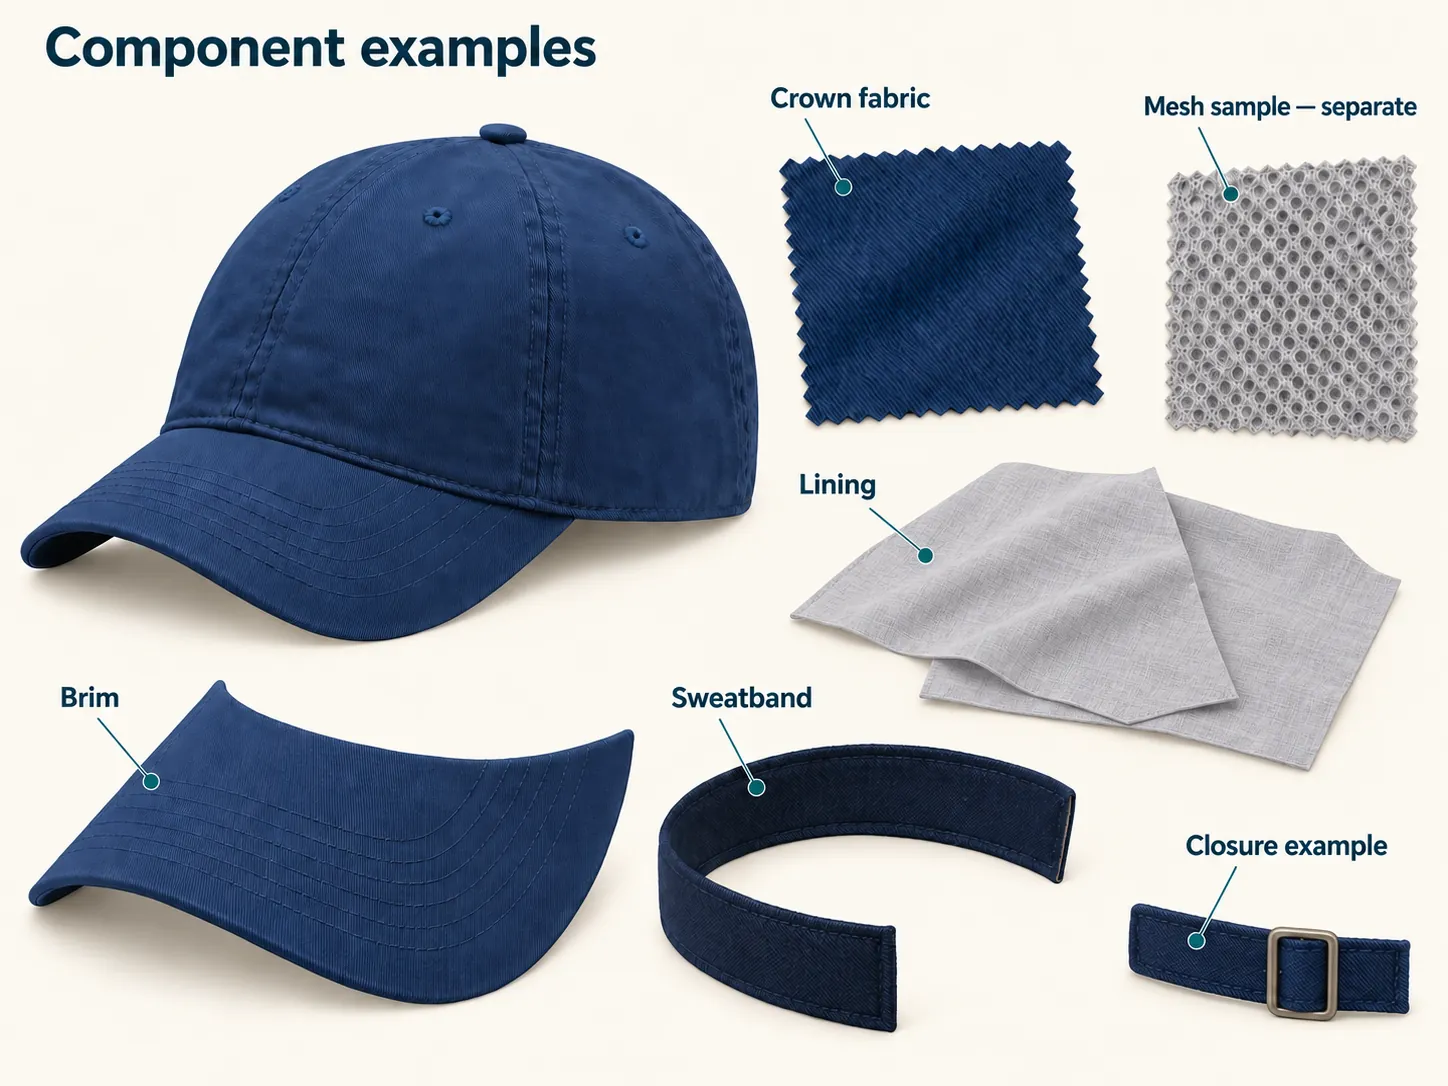
| Specification layer | Example wording | What to confirm |
|---|---|---|
| Fibre composition | Cotton, polyester or a stated blend | Percentages and the components covered |
| Fabric construction | Twill, canvas, mesh, corduroy or terry | Structure, thickness, opening or pile details and location |
| Surface or finish | Washed, distressed or suede-style | Actual process, material and approved appearance |
| Performance requirement | Airflow, water resistance or sunlight protection | Applicable method, result, limits and exact tested configuration |
Record the crown, brim and closure independently
Panel count is one part of crown construction. Also describe the profile, depth, support, seams and lining. A five-panel or six-panel description does not by itself establish the shape of the front artwork area, the firmness of the crown or how the hat will fit.
Keep brim and closure decisions equally clear. Define the desired curve, width and projection, and identify whether the selected back uses snaps, a buckle, another adjuster or a fitted construction. Review the actual mechanism and its contact with the wearer. For a brimmed hat, record the crown and brim measurements appropriate to that design rather than copying cap terminology.
- Crown: panel layout, depth, profile, support, lining and band.
- Brim: curvature, width, projection and the agreed measurement points.
- Rear: actual construction, fastening materials, movement and retention.
- Decoration area: seams, openings and support around the proposed artwork.
Choose the shape for the brief
Start with the wearing task, the silhouette and the space needed for your logo. The comparisons below help shortlist catalogue references; the selected version still needs its own construction and fit record.
| Direction | Useful comparison | Record before sampling |
|---|---|---|
| Baseball or trucker cap | A trucker direction often uses mesh rear panels; a baseball-cap reference may use fabric panels throughout. Compare the actual front support and rear construction. | Front fabric, mesh location, crown depth, brim shape and closure. Compare baseball references with trucker references. |
| Golf club uniform | Shortlist baseball caps, rope-front references or open-top visors according to the uniform, logo position and wearer preference. | Team colours, artwork area, fit range and head coverage. A golf description does not establish a tested performance result. |
| Running-style cap | Compare crown depth, brim profile, band contact, fastening and the position of mesh or perforations. | Visible features are not proof of cooling, drying, water resistance or a sun-protection rating. Identify any required evidence for the exact construction. |
| Bucket or boonie hat | Compare the all-round brim, crown depth, vents and any chin strap or fastening actually present; the names alone do not settle these details. | Brim width and slope, band measurements, lining and strap arrangement. Begin with the bucket and boonie references. |
| Cowboy, fedora or rancher direction | These style names can overlap. Distinguish the selected silhouettes by the crown crease or pinch, brim curve, edge profile and support. | Attach labelled front, side and underside references and state the crown and brim dimensions. Use the structured-brim collection as a starting point. |
| Straw-style or woven hat | Choose the required weave, stiffness and silhouette, then identify the actual fibre rather than treating every woven appearance as the same material. | Composition, coating, lining, trim, crown and brim dimensions, plus the permitted packing method. Review straw and woven references. |
| Visor or full crown | An open-top visor leaves the top of the head uncovered; a full-crown hat covers that area. Compare the actual opening, band and brim geometry. | Intended wearing conditions, band contact and required coverage. An open or closed crown alone does not establish a protection rating. |
| Beanie, ear-flap hat or winter cap | Compare a knitted pull-on crown, added ear coverage, or a peaked cap construction with its selected lining. | Fibre composition, lining, stretch and measurements. A winter label is not a thermal test; use the winter headwear references to define the version. |
| Youth or children's brief | The catalogue includes child- or youth-labelled references, but the wording is not an age-suitability approval. | Send the intended age range, wearer measurements and destination requirements. Ask which selected version can be reviewed for its fit, fasteners and accessories; do not assume an adult design can simply be scaled down. |
Turn the reference into construction instructions
Five-panel and six-panel caps differ in panel and seam layout. Check whether a front seam crosses the proposed logo, then specify the usable artwork width, height and position on the selected crown. Panel count alone does not guarantee a single front panel or an uninterrupted decoration area.
A structured front uses support to retain a defined shape; an unstructured direction has a softer, more relaxed front. Request the actual backing and assembly rather than inferring firmness from panel count.
- Brim shape: use a front and side reference to distinguish a flat profile, a curved bill or a rolled edge. State the curve, edge treatment and required shape retention separately.
- Snapback: compare the usable engaged positions and secure retention, not just the number of holes.
- Hook-and-loop: record usable overlap and exposed edges at the required sizes.
- Buckle: record strap travel, locking and contact with the wearer. Silver-colour or gold-colour describes appearance, not the base metal; specify the metal and surface finish separately.
Separate head measurements from finished hat measurements
State whether a number describes the intended wearer's head or a measurement taken on the finished hat. Agree the measurement path, units and tolerance. A head circumference reference is useful only when its relationship to the selected size and construction is clear.
One Size, Adjustable and Custom Size are ordering descriptions, not complete fit specifications. Ask which measured range applies to the exact cap and inspect the adjustment travel and engagement on the sample. If several size references appear, assign the applicable one to each requested configuration instead of merging them into a wider range.
Review crown depth, band contact, brim coverage and closure contact on the intended wearer. Adult, child or baby labels also need individual size and suitability review; a label alone does not establish appropriate fastening or accessory construction.
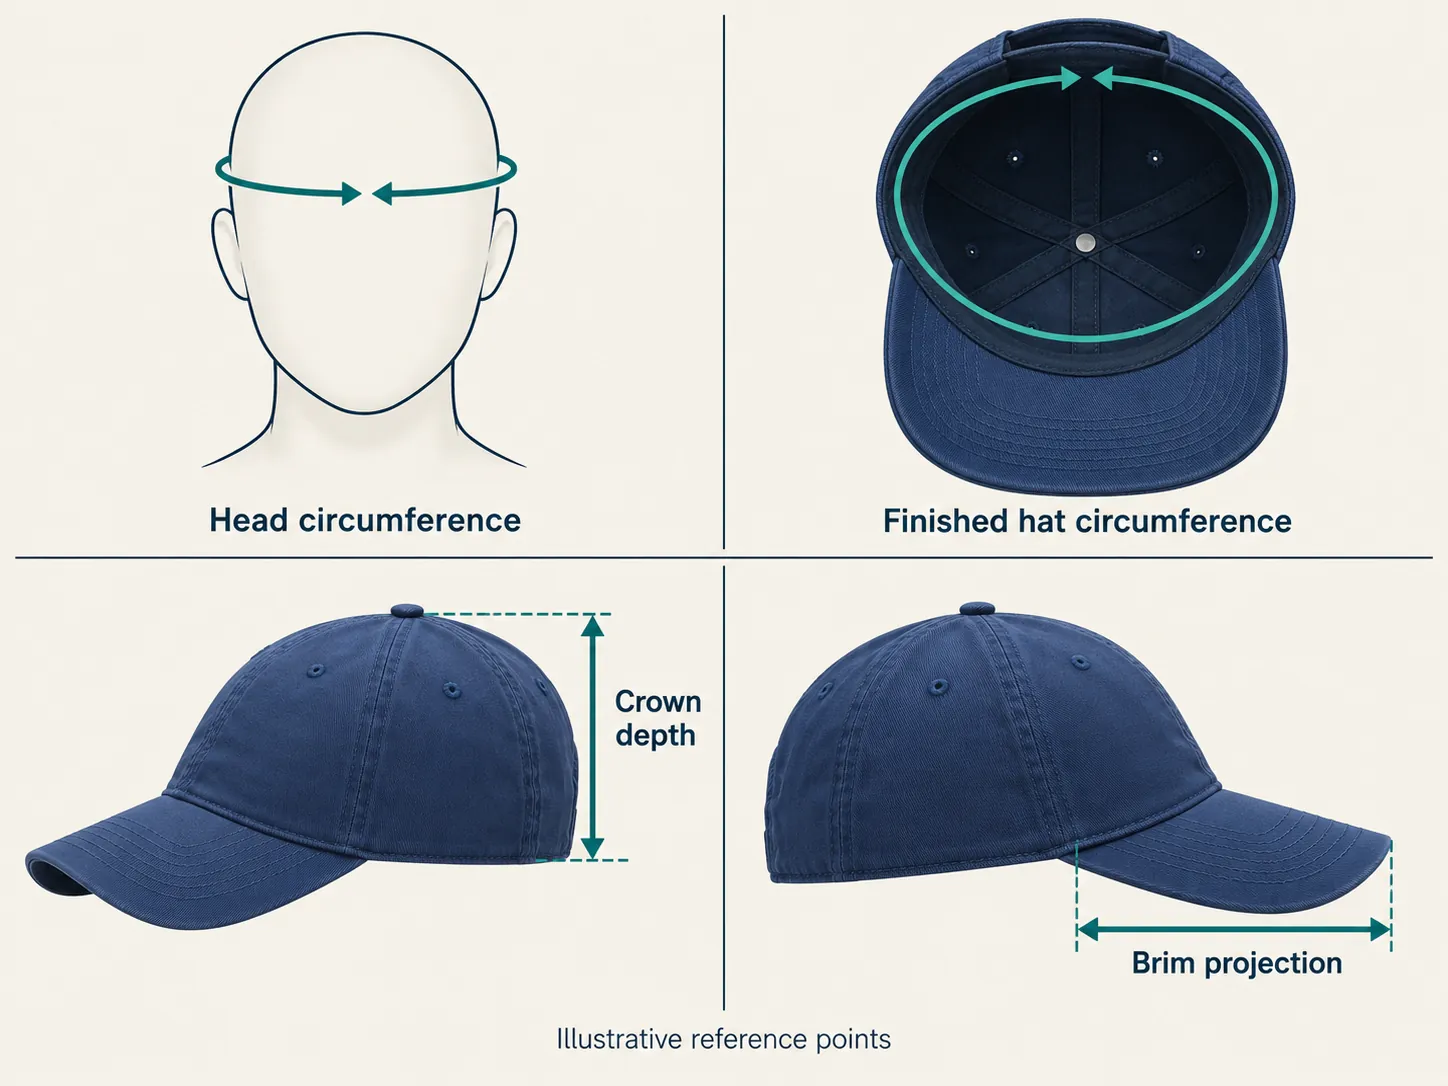
Measure an adult head at the intended band position
- Use a flexible measuring tape. Agree where the selected hat's band is intended to sit, across the forehead and above the ears.
- Circle the head at that position, keeping the tape level and untwisted around the back of the head.
- Keep it comfortably snug without pulling it tight. Repeat the measurement and record the result, unit and measurement position.
- Compare that wearer measurement with the selected version's stated fit range and the agreed sample. Do not substitute a finished-hat dimension for the head measurement.
Keep units and conflicting size references separate
One inch equals 2.54 centimetres: divide a centimetre value by 2.54 to express it in inches. Convert both endpoints of a stated range using the same agreed rounding. The inch equivalent describes the same range; it does not create additional adjustment or extend the range.
If different size references are shown, ask which measurement and range belong to the selected version. Keep the competing references separate until confirmed. Do not average them, combine them into a larger range or select whichever number appears most convenient.
Adjustable is not universal fit. Check the usable range with the fastening securely engaged. For a large-head or oversized brief, provide the actual circumference requirement and check crown depth, band contact and adjustment travel. One adult sample cannot establish fit for every intended wearer; define the wearer range and review representative fit samples.
Agree the points of measure
- Crown: record the required front, side and rear heights or depth, with a marked start and end point. Distinguish a vertical measurement from a length following the fabric contour.
- Cap bill: identify centre projection from the crown seam to the front edge, the width across the agreed points and the side-profile curve. A curved surface length and a straight projection are different measurements.
- All-round brim: record front, rear and side widths from the crown join to the edge, plus slope or curl. Use a labelled photo or sketch so both parties follow the same path.
- Inner band and lining: specify material, width, thickness, joins and position, and whether lining is partial or full. Review these together on the finished sample because they affect the space and contact inside the hat.
Check woven, felt and suede-style descriptions
Appearance words help describe a design direction, but they should not replace a material specification. A woven appearance does not identify the fibre, and suede-style wording does not establish animal leather. Likewise, a felt reference needs its own composition and construction detail.
Ask for the actual material, any backing, lining or coating, and the component where it is used. Review texture, colour and finish on the sample. Keep the selected care instructions attached to the complete decorated hat rather than inferring them from one appearance word.
Confirm what the material name includes
For suede-style or faux-suede wording, request the actual fibre composition, backing and any animal-origin components or trims. The appearance term alone does not confirm either genuine leather or an entirely animal-free hat. For wool-felt or felt-style wording, ask for the fibre percentages and the components covered; a felt appearance does not establish a wool percentage.
Paper straw, natural straw and papyrus references need their own material identity, weave or braid, coating and accessory specification. Keep those details distinct from the hat's colour and silhouette.
Check packing against the selected construction
Do not assume a straw or felt hat can be folded or packed flat. Ask for the permitted method for the selected version and any shape-restoration instructions, then assess the crown, brim, trim and decoration after that packing method. A flexible-looking photograph is not a folding instruction.
Approve colour and finish with the complete hat
Use a physical shade or another agreed colour reference when matching fabric, thread, print or trim. Show where each colour belongs, especially on a crown, brim and mesh combination. Reversing two colours can create a different configuration even when the same colour names appear.
Review washed, distressed or other requested effects with the artwork, seams and cut edges. If you require a performance result, identify the intended use and request evidence for the relevant construction and treatment. Visible mesh or perforations can be described as features without promising a particular airflow or weather result.
Record the appearance you are approving
For camouflage, leopard or another all-over pattern, identify the selected colourway, motif scale and placement on each visible panel; agree any acceptable variation caused by cutting the fabric. For two-tone designs, map each colour to the front, rear, brim and underside rather than approving an unordered pair of colour names.
A screen image is a useful discussion reference, not a physical colour standard. Compare the fabric, thread, print and trim with the agreed physical reference under agreed viewing conditions. For washed or distressed effects, approve the degree and location of fading, abrasion or edge treatment and record the permitted variation with sample photographs.
Request care instructions for the completed decorated hat, including the fabric, support, lining, thread, print, patch and any attachment. Do not infer washability, heat tolerance or cleaning methods from a fibre name alone; keep the confirmed instructions with the approved sample record.
Bring your own material requirement into the brief
Relia Hats works with customer-specified material requirements as part of custom hat development. Send the composition, construction, colour, component location and any physical reference that explains your target. Include intended use and the points you want resolved before sample approval.
Connect the accepted material to the final fit, artwork and care record. Use the sample approval guide to record the chosen version, or discuss your material and fit requirements directly with Relia Hats.